Audiovisual – Motion Graphics
Editorial
Photography


Graphic design workshops
A-levels / Foundation course
As a design educator, I’ve developed and refined a series of workshops adaptable from a few hours to several days. Designed for small groups of students aged 15 to 21, these sessions explore printmaking techniques, typographic compositions, banner design, zine and poster design, the learning of Adobe software, and mixed media approaches incorporating photography, sound, and video.

Printmaking
workshop
5-days, 4–10 students
The Beijing Peeling Wall Collective, a local group of artists interested in urban textures and visual ways of representing the city, has tasked students with fulfiling a design brief over this five-day workshop. They used screen printing, lino printing, and digital printing techniques with Adobe Photoshop, to create a series of posters. They also engaged in bookbinding by collecting print scraps to create a concertina book. This workshop is designed to teach fundamental skills in printmaking and provide insights into how a graphic design project could evolve from scratch.


Screen printing was used to create a B&W abstract background, after extracting shapes from street walls and floors. Lino printing was used as foreground and second layer, to create small illustrations on the prints. Then, each student developed a concept for one or two posters, edited with Photoshop and printed in A3 format. With all the print scraps from the first days, concertina booklets were made, later animated with Photoshop as a GIF.
Lino-print
pattern workshop
3 days, 8–15 students
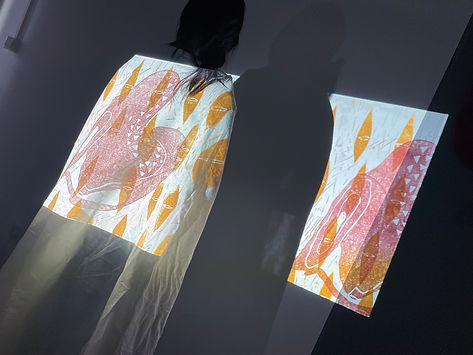
Drawing inspiration from their research and keywords, students extracted shapes and lines from photographs to combine two different patterns, one more geometric and the other more organic. They had to draw and carve these different layers on lino blocks, then printing with complementary colours on paper, repeating them as many times as possible to fill in an A2 format. They had to print on different types of paper but also on fabrics to test their design and see different ways of presenting it. The final print was then photographed to be projected on body, objects and space. This workshop usually takes place at the beginning of the course as it not only benefits visual communicators from all specialities, but also students interested in textile and interior design.


Banner design
workshop
3 days, 4–10 students
Based on the research done during the first two weeks, students had to brainstorm and sketch a slogan to use in an imaginary protest to bring awareness on their project’s theme. They explored typography and layout design, using bondaweb and the sewing machines to fix each letter to their calico banner. Finally, they took photographs of their result in context, later making a GIF as part of a social impact campaign.


Typo Ad
campaign
2 or 3 days, 4–10 students
In this workshop, students experimented with screen-printing by first designing new letters using a grid (construct), developing a slogan and printing it while combining colours and layers. Then, they deconstructed their prints using cutting techniques and a scanner, to reconstruct a series of new posters with Photoshop. The process concluded with animating the slogan as a GIF created from a sequence of images. In this imaginary protest, the message each student chooses aims to raise awareness on their project’s theme as part of a social impact campaign.


Audio-visual
workshop
3 days, 8–15 students
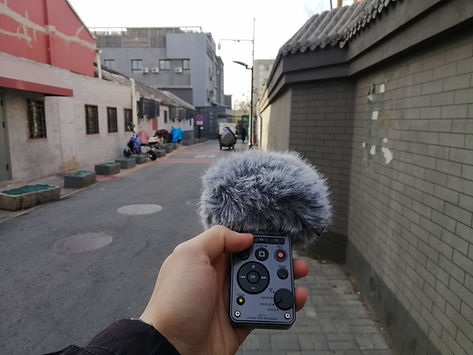
In this workshop, students had to develop a short narrative that combined past and present memories through sound and moving image. On the first day, they went outside to record a series of sounds connected to their first impressions to then edit a thirty to sixty seconds sound piece. On the second day, students were asked to visualise this sound piece through a series of experimental videos which, together, had to create an immersive experience emphasising emotion, colour and the passage of time. On the last day, they selected frames of the video and added new layers by animating shapes, symbols and letters over the original footage. This last step was done using an iPad, Photoshop, or by hand, drawing directly onto each individual frame.


Example of a student's work – Wilfred (2024)
Example of a student's work – Christian (2025)

Data visualization
workshop
1 day, 8–15 students
Inspired by Domestic Data Streamers’ Bathroom data and Data strings projects, among other examples, students were asked to design and develop a small interactive installation to be placed near BACA’s bathroom. They first had to search for visual and conceptual references, then sketch ideas by defining a method of interaction and a research question they wished to test. They developed a small-scale prototype, gathered feedback through testing with tutor and classmates and, based on their corrections, they designed the real model to be ultimately tested with the whole cohort.


Although I had organised similar activities before in the Foundation course, this was the first time they were structured as a data visualization workshop.


In 2022, I encouraged one student to develop debate-driven activities through improvised interactive grids.


In 2023, a UX design student produced a series of scenario-based panels as part of his FMP. Inspired by the trolley problem, these scenarios were designed to provoke audience reflection on themes including life and death, economy and politics, social contracts, and social justice.

Typo-collage
workshop
2 hours, 8–15 students
In this two-hours workshop, students learned to create experimental typographic compositions inspired by David Carson works. They first had to deconstruct letters, words, paragraphs and pieces of material. Then, through collage techniques, they had to reconstruct these elements into scenes that show balance and movement. They were asked to use the scanner to improve their A3 compositions.


Adobe Software
Lessons
2 hours, 8–15 students
Every year, in these two-hour software lessons, I teach students the basic tools and effects of Photoshop, Illustrator, InDesign and After Effects using model examples. In the first hour, students follow along with guided steps, while in the second hour, they apply what they have learned to create something new.


Onomatopoeia:
type experiments
2 hours or 2 days
8–15 students
In this two-hours workshop, students learned to draw variations of a letter using brushes, markers, charcoal or even tape. Then, they had to deconstruct each letter into pieces and rearrange them by combining different parts together. This experimental process, done in pairs, allowed them to create a series of onomatopoeias as visual compositions, to be ultimately scanned and printed.


If done over two days, students follow the same process of letter construction, deconstruction and reconstruction until they have developed a slogan instead of an onomatopoeia. Then, using the discarded pieces, they can create a large collective composition. On the second day, they have time to edit the letters with Photoshop, learning the software's basic tools, and then present an A3 poster featuring their slogan.


Zine design
2 or 3 days,
8–15 students
In this hands-on workshop, students explored how to create meaningful and visually engaging graphic compositions through collage techniques, working with both posters and zines. In the 3-day workshop, they first experimented with mark-making, creating marks in black and white, then colour, to ultimately rip up their artboards and recompose them through collage techniques. With these new collages, they used the scanner/printer to create pages for an A5 zine sharing a short visual narrative on a cultural topic that interested them, whether this was a film, a song, an artist, a game or any other creative subject. As visual communicators, they learned how to combine textures, shapes, colours, images and text while paying attention to scale, contrast, space, rhythm, variety and narrative meaning in order to create a series of experimental compositions.


In the 2-day version of the workshop, students represented a song or music style through a series of textures created using a foil monoprint technique. These were then selected, scanned, printed and finally cut out to create a first A3 collage following a template. Once this was done, they used the leftover scraps of paper to cut and paste pieces together, scanning and printing them again, to create several collages. Through this process, they produced enough background pages for a small A6 or A5 zine. Finally, they added lyrics or other visual elements to the pages, either by hand or using Adobe InDesign or Procreate, to build a cohesive visual narrative.


